If Baby Shark is the anthem being played 24/7 at your house, then this is definitely the perfect craft for you and your child. The best part is that it is both budget friendly, recyclable and a fun way to bond with your child.
Making your Baby Shark
Materials
- Paper plates
- Scissors, on hand
- Pencil & eraser if needed for extra confidence, on hand
Instructions
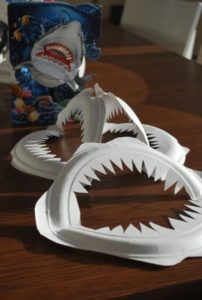
- Fold your paper plate in half “backwards” (with the bottom of the plate facing you, and the folded edges coming toward you).
- Using small scissors trim away the outer edges of the plate in a sweeping arched “M” design on the top half and bottom half, which should leave it looking like the hinges on the jaw, and the “m” shaped bottom & top of the mouth. Look at pictures on Google of real shark jaws to get inspiration, if the craft-samples in the photos don’t help you visualize the outline.
- Cut out a large oval from the middle, and then work from that center to cut out free-form teeth that follow the inside arc of the paper plate on the top and bottom. I just snipped away happily. Shark teeth are often quite irregular and jagged and not always parallel.
- Poke two holes on the edges of the mask and run an elastic or string through
Craft Sourced from Dollar Store Crafts
Weekend Crafting: Paper Plate Snowman

Weekend Crafting: Paper Plate Snowman
Dec 28, 2018
1
min
Weekend Crafting: Clothespin Airplane
Weekend Crafting: Clothespin Airplane
Mar 8, 2019
1
min
Exploring Nature – Spring Activities And Crafts For Kids

Exploring Nature – Spring Activities And Crafts For Kids
Mar 28, 2022
5
min